Strict Standards: Non-static method serendipity_plugin_api::hook_event() should not be called statically in /home/buzzard/www/www/blog/include/functions_smarty.inc.php on line 553
Strict Standards: Non-static method serendipity_plugin_api::get_event_plugins() should not be called statically in /home/buzzard/www/www/blog/include/plugin_api.inc.php on line 1041
Last time we had gotten to the point where the overlays had been glued up, now it's time to finish this thing!
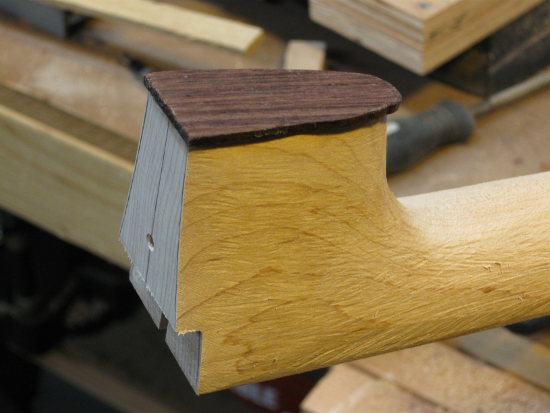
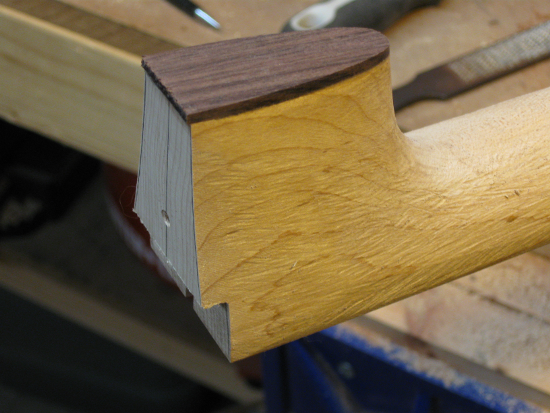
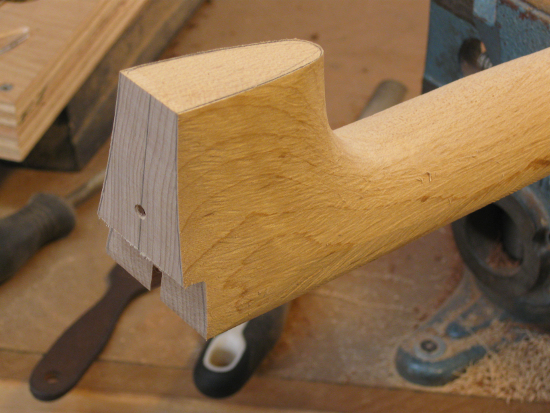
The next step is to shape the heel overlay to match the carved heel.
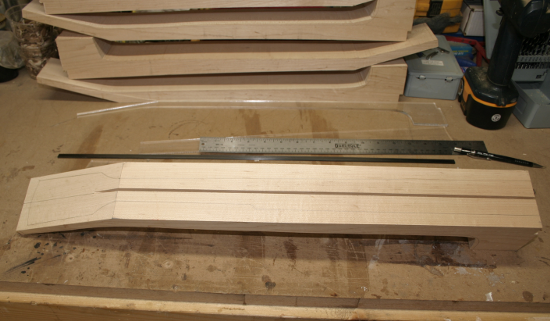
Now that the heal is shaped I move on to the headstock.
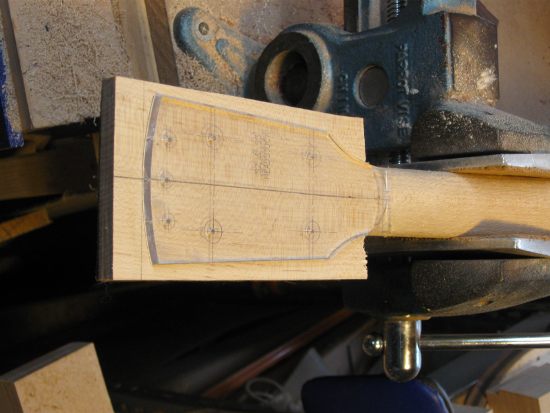
First, I use a sanding block and flatten out the back side of the headstock.
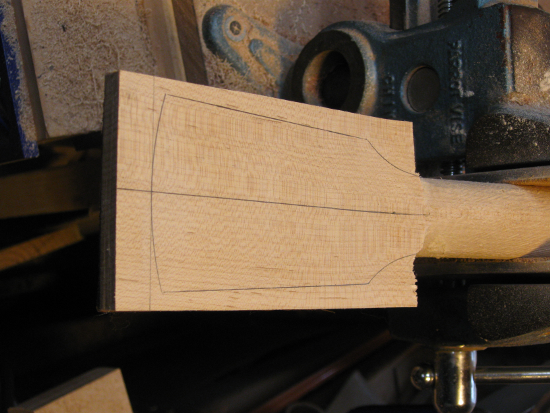
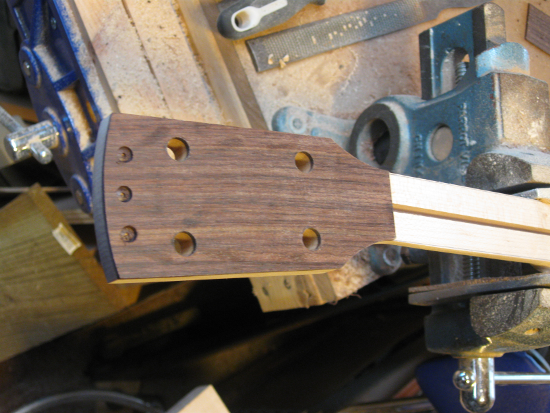
Then Using my template, I trace the outline of the Somerset headstock.
Then after a trip through the band saw to rough cut the profile I have this.
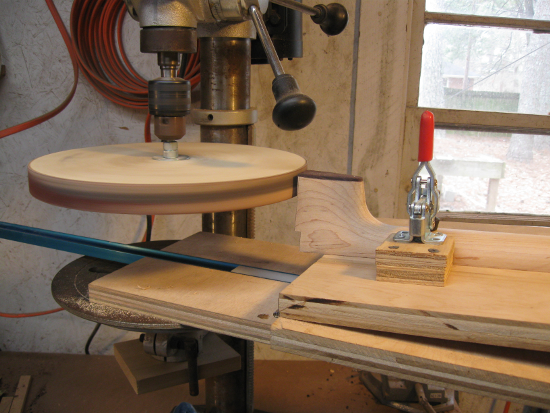
Once it is roughed out I take it to my oscillating sander and true the headstock up to the lines.
Now I can finish shaping the transition between neck and headstock, again using varies rasps and files.
Using a similar jig set up as I did to dress the heel to the right height and angle, I now attach an 11" diameter sanding disk to profile the heel to fit the rim.
Next I locate the tuner holes and drill those with my drill press.
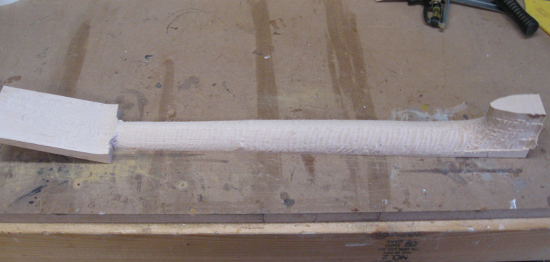
Once I have reached this point I do the finish sanding of the neck down to 120 grit, leaving the final sanding and finishing to Chris & Lowell.
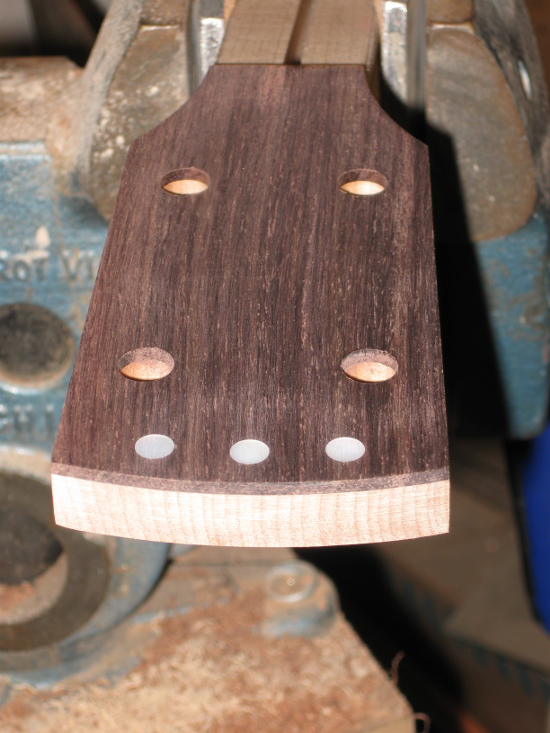
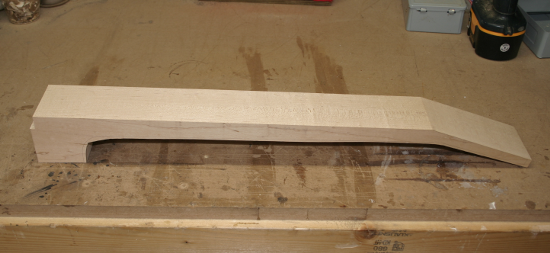
Well this neck is nearly complete, it just needs the signature 3 dots installed to officially become a Somerset neck.
First, I locate and drill the holes for the dots.
Then, with a little help of the old glue, I place the dots in the overlay.
The last step is to sand the overlay and dots down flush.
That's it folks! This blank is destined to be a Somerset S-2, it is on it's way to Chris where it will be fitted with the fretboard and attached to the rim. Chris has said that he will document his process as well so the journey continues.
The necks where cut to a basic squared neck shape, and the slot for the truss rod had been cut.
In this episode we will begin to shape up the neck to its finished form, and we will get the headstock and heel overlays attached.
The next step is too strap a blank into my hand built Copy Carver. The Copy Carver will remove about 85% of the remaining excess wood. It is set up to leave the neck +1/16in larger then the master neck, this allows me to hand finish each neck and make any adjustments during the final processes.
Here is a short video of the part of the process, thanks to Doc Boggs for the background music!
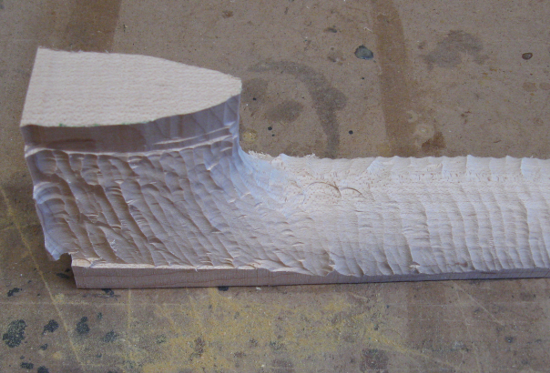
This process still leaves the neck in rough shape.
For the next few steps I clamp the neck into my Parrot Vise to secure it while I continue to carve it using a draw knife, rasps and files.
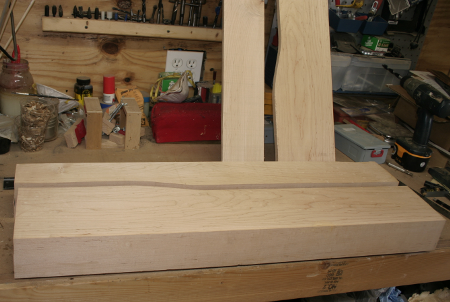
First I true up the neck from the top side, carving the neck down to just outside my template lines:
Next I flip the neck over and finish rough carving most of the back:
I then set up one of my jigs to plane the heel to the proper depth and the correct angle. This jig allows me to slide the neck towards the cutter head while keeping it at a set angle. The cutter is the Wagner Safety Planer, which I'm using here in not the safest way.
Now using my templates I trace on the heel shapes and carve the necks back to the lines. The templates are just guides that help me maintain consistency with the necks, however each piece of wood is different and must be adjusted accordingly.
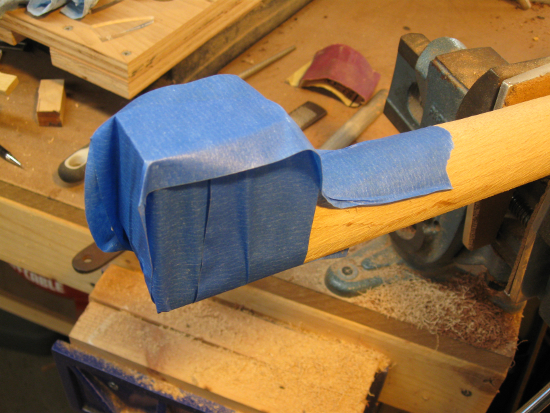
The neck is now ready to glue up the overlays for the headstock and heel. A little bit of PVA wood glue and some clamping will do the job. The glue I use only needs to be clamped for about 30 mins, but I usually leave it clamped up overnight just to be safe. On the heel I use blue painters tape as it doesn't require a great deal of pressure to set correctly. It might be important to note that you do not want to clamp things to tight as this will "Starve" the joint and the glue will not set properly.
The next step was to use the old jointer and true up the fretboard side and the headstock. Using the jointer to make sure these surfaces are dead flat and at the correct angle to each other.
Now that the top is flat and perpendicular to the sides, I run the blank through the table saw to cut the groove that will hold the truss rod. Make sure you run it through in both directions to insure that the groove is centered! Then I take the blank to my oscillating spindle sander and true up the back side of the headstock, the rest of the back is still over sized but I will take care of this later. I also draw in the fret board shape with my templates at this time to prepare for the next step.
Now I take the blanks back to the band saw and cut off the excess, being careful to stay +1/16 or so outside the lines. This gives me a rough blank that is starting to look like a neck!
Thats it for now, stay tunned for the next episode of "The Making of a Somerset"! Will neck blank #1 finally find true love? Will neck blank #5 tell the group it's big secret? Will neck blank #2 be kicked out of the shop? You'll just have to tune in next time to find out!
I thought I would document the building process I use for making the Somerset necks with this next batch I am currently working on. I will do this as I progress over the next week or so. The process I use is a combination of experience, research and trial and error, if you are looking to build your own necks you should be able to use many of my techniques, however some are specific to doing multiple necks at a time.
Part 1
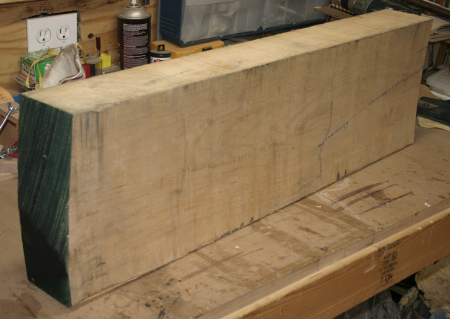
I start with a large piece of wood, for this group it is a section of a FAS qualityHard Maple board that was 16/4s (4 inches) by 11 inches by 8 feet long which I cut down into thirds. These are rough sawn boards that have been air tried a minimum on 2 years.
I take this beast and run it through my thickness planer and jointer to square up the edges and expose the grain.
I then cut the log down to a manageable size and remove the excess depth. I usually purchase 12/4 (3 inch) stock, but the last time I went to my hardwood supplier all they had was the thicker 16/4 (4 inch) stock.
Once I can see the grain I can begin to layout how many necks I can get out of it, being careful to avoid any imperfections in the wood. I use a laser cut acrylic template I had made specifically to my design for the Somerset necks. If you are making a neck yourself, you will want to use a template. Prior to having the acrylic templates I used a print out pasted to a piece of hardboard and then cut to size, this method works just fine for one off design, but consistency is important in a production model.
Next, I run these blanks through the band saw being careful to stay 1/8 inch or so outside of my lines. This allows me a little wiggle room as I move forward.
This process leaves me with a rough blank.
If you are interested in carving your own neck and would like a blank at this stage just contact me for a price.
« previous page
(Page 2 of 2, totaling 14 entries)
Strict Standards: Non-static method serendipity_plugin_api::hook_event() should not be called statically in /home/buzzard/www/www/blog/include/functions_smarty.inc.php on line 553
Strict Standards: Non-static method serendipity_plugin_api::get_event_plugins() should not be called statically in /home/buzzard/www/www/blog/include/plugin_api.inc.php on line 1041
Strict Standards: Non-static method serendipity_plugin_api::generate_plugins() should not be called statically in /home/buzzard/www/www/blog/include/functions_smarty.inc.php on line 611
Strict Standards: Non-static method serendipity_plugin_api::enum_plugins() should not be called statically in /home/buzzard/www/www/blog/include/plugin_api.inc.php on line 847
Strict Standards: Non-static method serendipity_plugin_api::hook_event() should not be called statically in /home/buzzard/www/www/blog/include/plugin_api.inc.php on line 860
Strict Standards: Non-static method serendipity_plugin_api::get_event_plugins() should not be called statically in /home/buzzard/www/www/blog/include/plugin_api.inc.php on line 1041
Strict Standards: Non-static method serendipity_plugin_api::load_plugin() should not be called statically in /home/buzzard/www/www/blog/include/plugin_api.inc.php on line 872
Strict Standards: Non-static method serendipity_plugin_api::probePlugin() should not be called statically in /home/buzzard/www/www/blog/include/plugin_api.inc.php on line 571
Strict Standards: Non-static method serendipity_plugin_api::getClassByInstanceID() should not be called statically in /home/buzzard/www/www/blog/include/plugin_api.inc.php on line 521
Strict Standards: Non-static method serendipity_plugin_api::includePlugin() should not be called statically in /home/buzzard/www/www/blog/include/plugin_api.inc.php on line 526
Strict Standards: Non-static method serendipity_plugin_api::hook_event() should not be called statically in /home/buzzard/www/www/blog/include/plugin_api.inc.php on line 902
Strict Standards: Non-static method serendipity_plugin_api::get_event_plugins() should not be called statically in /home/buzzard/www/www/blog/include/plugin_api.inc.php on line 1041
Strict Standards: Only variables should be assigned by reference in /home/buzzard/www/www/blog/include/functions_smarty.inc.php on line 73
Quicksearch
Deprecated: Non-static method serendipity_plugin_api::hook_event() should not be called statically, assuming $this from incompatible context in /home/buzzard/www/www/blog/include/plugin_internal.inc.php on line 408
Deprecated: Non-static method serendipity_plugin_api::get_event_plugins() should not be called statically, assuming $this from incompatible context in /home/buzzard/www/www/blog/include/plugin_api.inc.php on line 1041
Show tagged entries
Deprecated: Non-static method serendipity_event_freetag::displayTags() should not be called statically, assuming $this from incompatible context in /home/buzzard/www/www/blog/plugins/serendipity_event_freetag/serendipity_plugin_freetag.php on line 220
Deprecated: Non-static method serendipity_event_freetag::renderTags() should not be called statically, assuming $this from incompatible context in /home/buzzard/www/www/blog/plugins/serendipity_event_freetag/serendipity_event_freetag.php on line 496
Deprecated: Non-static method serendipity_event_freetag::makeURLTag() should not be called statically, assuming $this from incompatible context in /home/buzzard/www/www/blog/plugins/serendipity_event_freetag/serendipity_event_freetag.php on line 568 banjo Deprecated: Non-static method serendipity_event_freetag::makeURLTag() should not be called statically, assuming $this from incompatible context in /home/buzzard/www/www/blog/plugins/serendipity_event_freetag/serendipity_event_freetag.php on line 568 banjo building Deprecated: Non-static method serendipity_event_freetag::makeURLTag() should not be called statically, assuming $this from incompatible context in /home/buzzard/www/www/blog/plugins/serendipity_event_freetag/serendipity_event_freetag.php on line 568 bluegrass Deprecated: Non-static method serendipity_event_freetag::makeURLTag() should not be called statically, assuming $this from incompatible context in /home/buzzard/www/www/blog/plugins/serendipity_event_freetag/serendipity_event_freetag.php on line 568 bm09001 Deprecated: Non-static method serendipity_event_freetag::makeURLTag() should not be called statically, assuming $this from incompatible context in /home/buzzard/www/www/blog/plugins/serendipity_event_freetag/serendipity_event_freetag.php on line 568 bm09002 Deprecated: Non-static method serendipity_event_freetag::makeURLTag() should not be called statically, assuming $this from incompatible context in /home/buzzard/www/www/blog/plugins/serendipity_event_freetag/serendipity_event_freetag.php on line 568 bm09003 Deprecated: Non-static method serendipity_event_freetag::makeURLTag() should not be called statically, assuming $this from incompatible context in /home/buzzard/www/www/blog/plugins/serendipity_event_freetag/serendipity_event_freetag.php on line 568 bm09005 Deprecated: Non-static method serendipity_event_freetag::makeURLTag() should not be called statically, assuming $this from incompatible context in /home/buzzard/www/www/blog/plugins/serendipity_event_freetag/serendipity_event_freetag.php on line 568 bubinga Deprecated: Non-static method serendipity_event_freetag::makeURLTag() should not be called statically, assuming $this from incompatible context in /home/buzzard/www/www/blog/plugins/serendipity_event_freetag/serendipity_event_freetag.php on line 568 budget Deprecated: Non-static method serendipity_event_freetag::makeURLTag() should not be called statically, assuming $this from incompatible context in /home/buzzard/www/www/blog/plugins/serendipity_event_freetag/serendipity_event_freetag.php on line 568 building Deprecated: Non-static method serendipity_event_freetag::makeURLTag() should not be called statically, assuming $this from incompatible context in /home/buzzard/www/www/blog/plugins/serendipity_event_freetag/serendipity_event_freetag.php on line 568 cocobolo Deprecated: Non-static method serendipity_event_freetag::makeURLTag() should not be called statically, assuming $this from incompatible context in /home/buzzard/www/www/blog/plugins/serendipity_event_freetag/serendipity_event_freetag.php on line 568 gibson Deprecated: Non-static method serendipity_event_freetag::makeURLTag() should not be called statically, assuming $this from incompatible context in /home/buzzard/www/www/blog/plugins/serendipity_event_freetag/serendipity_event_freetag.php on line 568 gourd banjo Deprecated: Non-static method serendipity_event_freetag::makeURLTag() should not be called statically, assuming $this from incompatible context in /home/buzzard/www/www/blog/plugins/serendipity_event_freetag/serendipity_event_freetag.php on line 568 henry reed fiddlers convention Deprecated: Non-static method serendipity_event_freetag::makeURLTag() should not be called statically, assuming $this from incompatible context in /home/buzzard/www/www/blog/plugins/serendipity_event_freetag/serendipity_event_freetag.php on line 568 project Deprecated: Non-static method serendipity_event_freetag::makeURLTag() should not be called statically, assuming $this from incompatible context in /home/buzzard/www/www/blog/plugins/serendipity_event_freetag/serendipity_event_freetag.php on line 568 repair & conversion Deprecated: Non-static method serendipity_event_freetag::makeURLTag() should not be called statically, assuming $this from incompatible context in /home/buzzard/www/www/blog/plugins/serendipity_event_freetag/serendipity_event_freetag.php on line 568 road kill Deprecated: Non-static method serendipity_event_freetag::makeURLTag() should not be called statically, assuming $this from incompatible context in /home/buzzard/www/www/blog/plugins/serendipity_event_freetag/serendipity_event_freetag.php on line 568 Site Updates Deprecated: Non-static method serendipity_event_freetag::makeURLTag() should not be called statically, assuming $this from incompatible context in /home/buzzard/www/www/blog/plugins/serendipity_event_freetag/serendipity_event_freetag.php on line 568 somerset banjos Deprecated: Non-static method serendipity_event_freetag::makeURLTag() should not be called statically, assuming $this from incompatible context in /home/buzzard/www/www/blog/plugins/serendipity_event_freetag/serendipity_event_freetag.php on line 568 sound files Deprecated: Non-static method serendipity_event_freetag::makeURLTag() should not be called statically, assuming $this from incompatible context in /home/buzzard/www/www/blog/plugins/serendipity_event_freetag/serendipity_event_freetag.php on line 568 vega little wonder Deprecated: Non-static method serendipity_event_freetag::makeURLTag() should not be called statically, assuming $this from incompatible context in /home/buzzard/www/www/blog/plugins/serendipity_event_freetag/serendipity_event_freetag.php on line 568 video
Deprecated: Non-static method serendipity_plugin_api::hook_event() should not be called statically, assuming $this from incompatible context in /home/buzzard/www/www/blog/plugins/serendipity_plugin_creativecommons/serendipity_plugin_creativecommons.php on line 47
Deprecated: Non-static method serendipity_plugin_api::get_event_plugins() should not be called statically, assuming $this from incompatible context in /home/buzzard/www/www/blog/include/plugin_api.inc.php on line 1041
Deprecated: mysql_connect(): The mysql extension is deprecated and will be removed in the future: use mysqli or PDO instead in /home/buzzard/www/www/blog/include/db/mysql.inc.php on line 270
Strict Standards: Non-static method serendipity_plugin_api::hook_event() should not be called statically in /home/buzzard/www/www/blog/include/functions_config.inc.php on line 529
Strict Standards: Non-static method serendipity_plugin_api::get_event_plugins() should not be called statically in /home/buzzard/www/www/blog/include/plugin_api.inc.php on line 1041
Strict Standards: Non-static method serendipity_plugin_api::enum_plugins() should not be called statically in /home/buzzard/www/www/blog/include/plugin_api.inc.php on line 985
Strict Standards: Non-static method serendipity_plugin_api::load_plugin() should not be called statically in /home/buzzard/www/www/blog/include/plugin_api.inc.php on line 992
Strict Standards: Non-static method serendipity_plugin_api::probePlugin() should not be called statically in /home/buzzard/www/www/blog/include/plugin_api.inc.php on line 571
Strict Standards: Non-static method serendipity_plugin_api::getClassByInstanceID() should not be called statically in /home/buzzard/www/www/blog/include/plugin_api.inc.php on line 521
Strict Standards: Non-static method serendipity_plugin_api::includePlugin() should not be called statically in /home/buzzard/www/www/blog/include/plugin_api.inc.php on line 526
Strict Standards: Declaration of serendipity_event_s9ymarkup::event_hook() should be compatible with serendipity_event::event_hook($event, &$bag, &$eventData, $addData = NULL) in /home/buzzard/www/www/blog/plugins/serendipity_event_s9ymarkup/serendipity_event_s9ymarkup.php on line 135
Strict Standards: Declaration of serendipity_event_s9ymarkup::uninstall() should be compatible with serendipity_plugin::uninstall(&$propbag) in /home/buzzard/www/www/blog/plugins/serendipity_event_s9ymarkup/serendipity_event_s9ymarkup.php on line 135
Strict Standards: Non-static method serendipity_plugin_api::get_plugin_title() should not be called statically in /home/buzzard/www/www/blog/include/plugin_api.inc.php on line 996
Strict Standards: Non-static method serendipity_plugin_api::load_plugin() should not be called statically in /home/buzzard/www/www/blog/include/plugin_api.inc.php on line 992
Strict Standards: Non-static method serendipity_plugin_api::probePlugin() should not be called statically in /home/buzzard/www/www/blog/include/plugin_api.inc.php on line 571
Strict Standards: Non-static method serendipity_plugin_api::getClassByInstanceID() should not be called statically in /home/buzzard/www/www/blog/include/plugin_api.inc.php on line 521
Strict Standards: Non-static method serendipity_plugin_api::includePlugin() should not be called statically in /home/buzzard/www/www/blog/include/plugin_api.inc.php on line 526
Strict Standards: Declaration of serendipity_event_emoticate::event_hook() should be compatible with serendipity_event::event_hook($event, &$bag, &$eventData, $addData = NULL) in /home/buzzard/www/www/blog/plugins/serendipity_event_emoticate/serendipity_event_emoticate.php on line 193
Strict Standards: Declaration of serendipity_event_emoticate::uninstall() should be compatible with serendipity_plugin::uninstall(&$propbag) in /home/buzzard/www/www/blog/plugins/serendipity_event_emoticate/serendipity_event_emoticate.php on line 193
Strict Standards: Non-static method serendipity_plugin_api::get_plugin_title() should not be called statically in /home/buzzard/www/www/blog/include/plugin_api.inc.php on line 996
Strict Standards: Non-static method serendipity_plugin_api::load_plugin() should not be called statically in /home/buzzard/www/www/blog/include/plugin_api.inc.php on line 992
Strict Standards: Non-static method serendipity_plugin_api::probePlugin() should not be called statically in /home/buzzard/www/www/blog/include/plugin_api.inc.php on line 571
Strict Standards: Non-static method serendipity_plugin_api::getClassByInstanceID() should not be called statically in /home/buzzard/www/www/blog/include/plugin_api.inc.php on line 521
Strict Standards: Non-static method serendipity_plugin_api::includePlugin() should not be called statically in /home/buzzard/www/www/blog/include/plugin_api.inc.php on line 526
Strict Standards: Declaration of serendipity_event_nl2br::event_hook() should be compatible with serendipity_event::event_hook($event, &$bag, &$eventData, $addData = NULL) in /home/buzzard/www/www/blog/plugins/serendipity_event_nl2br/serendipity_event_nl2br.php on line 384
Strict Standards: Declaration of serendipity_event_nl2br::uninstall() should be compatible with serendipity_plugin::uninstall(&$propbag) in /home/buzzard/www/www/blog/plugins/serendipity_event_nl2br/serendipity_event_nl2br.php on line 384
Strict Standards: Non-static method serendipity_plugin_api::get_plugin_title() should not be called statically in /home/buzzard/www/www/blog/include/plugin_api.inc.php on line 996
Strict Standards: Non-static method serendipity_plugin_api::load_plugin() should not be called statically in /home/buzzard/www/www/blog/include/plugin_api.inc.php on line 992
Strict Standards: Non-static method serendipity_plugin_api::probePlugin() should not be called statically in /home/buzzard/www/www/blog/include/plugin_api.inc.php on line 571
Strict Standards: Non-static method serendipity_plugin_api::getClassByInstanceID() should not be called statically in /home/buzzard/www/www/blog/include/plugin_api.inc.php on line 521
Strict Standards: Non-static method serendipity_plugin_api::includePlugin() should not be called statically in /home/buzzard/www/www/blog/include/plugin_api.inc.php on line 526
Strict Standards: Declaration of serendipity_event_browsercompatibility::event_hook() should be compatible with serendipity_event::event_hook($event, &$bag, &$eventData, $addData = NULL) in /home/buzzard/www/www/blog/plugins/serendipity_event_browsercompatibility/serendipity_event_browsercompatibility.php on line 80
Strict Standards: Non-static method serendipity_plugin_api::get_plugin_title() should not be called statically in /home/buzzard/www/www/blog/include/plugin_api.inc.php on line 996
Strict Standards: Non-static method serendipity_plugin_api::load_plugin() should not be called statically in /home/buzzard/www/www/blog/include/plugin_api.inc.php on line 992
Strict Standards: Non-static method serendipity_plugin_api::probePlugin() should not be called statically in /home/buzzard/www/www/blog/include/plugin_api.inc.php on line 571
Strict Standards: Non-static method serendipity_plugin_api::getClassByInstanceID() should not be called statically in /home/buzzard/www/www/blog/include/plugin_api.inc.php on line 521
Strict Standards: Non-static method serendipity_plugin_api::includePlugin() should not be called statically in /home/buzzard/www/www/blog/include/plugin_api.inc.php on line 526
Strict Standards: Declaration of serendipity_event_creativecommons::event_hook() should be compatible with serendipity_event::event_hook($event, &$bag, &$eventData, $addData = NULL) in /home/buzzard/www/www/blog/plugins/serendipity_event_creativecommons/serendipity_event_creativecommons.php on line 357
Strict Standards: Non-static method serendipity_plugin_api::get_plugin_title() should not be called statically in /home/buzzard/www/www/blog/include/plugin_api.inc.php on line 996
Strict Standards: Non-static method serendipity_plugin_api::load_plugin() should not be called statically in /home/buzzard/www/www/blog/include/plugin_api.inc.php on line 992
Strict Standards: Non-static method serendipity_plugin_api::probePlugin() should not be called statically in /home/buzzard/www/www/blog/include/plugin_api.inc.php on line 571
Strict Standards: Non-static method serendipity_plugin_api::getClassByInstanceID() should not be called statically in /home/buzzard/www/www/blog/include/plugin_api.inc.php on line 521
Strict Standards: Non-static method serendipity_plugin_api::includePlugin() should not be called statically in /home/buzzard/www/www/blog/include/plugin_api.inc.php on line 526
Strict Standards: Declaration of serendipity_event_spartacus::event_hook() should be compatible with serendipity_event::event_hook($event, &$bag, &$eventData, $addData = NULL) in /home/buzzard/www/www/blog/plugins/serendipity_event_spartacus/serendipity_event_spartacus.php on line 1172
Strict Standards: Non-static method serendipity_plugin_api::get_plugin_title() should not be called statically in /home/buzzard/www/www/blog/include/plugin_api.inc.php on line 996
Strict Standards: Non-static method serendipity_plugin_api::load_plugin() should not be called statically in /home/buzzard/www/www/blog/include/plugin_api.inc.php on line 992
Strict Standards: Non-static method serendipity_plugin_api::probePlugin() should not be called statically in /home/buzzard/www/www/blog/include/plugin_api.inc.php on line 571
Strict Standards: Non-static method serendipity_plugin_api::getClassByInstanceID() should not be called statically in /home/buzzard/www/www/blog/include/plugin_api.inc.php on line 521
Strict Standards: Non-static method serendipity_plugin_api::includePlugin() should not be called statically in /home/buzzard/www/www/blog/include/plugin_api.inc.php on line 526
Strict Standards: Declaration of serendipity_event_podcast::event_hook() should be compatible with serendipity_event::event_hook($event, &$bag, &$eventData, $addData = NULL) in /home/buzzard/www/www/blog/plugins/serendipity_event_podcast/serendipity_event_podcast.php on line 1225
Strict Standards: Non-static method serendipity_plugin_api::get_plugin_title() should not be called statically in /home/buzzard/www/www/blog/include/plugin_api.inc.php on line 996
Strict Standards: Non-static method serendipity_plugin_api::load_plugin() should not be called statically in /home/buzzard/www/www/blog/include/plugin_api.inc.php on line 992
Strict Standards: Non-static method serendipity_plugin_api::probePlugin() should not be called statically in /home/buzzard/www/www/blog/include/plugin_api.inc.php on line 571
Strict Standards: Non-static method serendipity_plugin_api::getClassByInstanceID() should not be called statically in /home/buzzard/www/www/blog/include/plugin_api.inc.php on line 521
Strict Standards: Non-static method serendipity_plugin_api::includePlugin() should not be called statically in /home/buzzard/www/www/blog/include/plugin_api.inc.php on line 526
Strict Standards: Declaration of serendipity_event_linklist::uninstall() should be compatible with serendipity_plugin::uninstall(&$propbag) in /home/buzzard/www/www/blog/plugins/serendipity_event_linklist/serendipity_event_linklist.php on line 830
Strict Standards: Non-static method serendipity_plugin_api::get_plugin_title() should not be called statically in /home/buzzard/www/www/blog/include/plugin_api.inc.php on line 996
Strict Standards: Non-static method serendipity_plugin_api::load_plugin() should not be called statically in /home/buzzard/www/www/blog/include/plugin_api.inc.php on line 992
Strict Standards: Non-static method serendipity_plugin_api::probePlugin() should not be called statically in /home/buzzard/www/www/blog/include/plugin_api.inc.php on line 571
Strict Standards: Non-static method serendipity_plugin_api::getClassByInstanceID() should not be called statically in /home/buzzard/www/www/blog/include/plugin_api.inc.php on line 521
Strict Standards: Non-static method serendipity_plugin_api::includePlugin() should not be called statically in /home/buzzard/www/www/blog/include/plugin_api.inc.php on line 526
Strict Standards: Declaration of serendipity_event_youtube::event_hook() should be compatible with serendipity_event::event_hook($event, &$bag, &$eventData, $addData = NULL) in /home/buzzard/www/www/blog/plugins/serendipity_event_youtube/serendipity_event_youtube.php on line 235
Strict Standards: Non-static method serendipity_plugin_api::get_plugin_title() should not be called statically in /home/buzzard/www/www/blog/include/plugin_api.inc.php on line 996
Strict Standards: Non-static method serendipity_plugin_api::hook_event() should not be called statically in /home/buzzard/www/www/blog/include/functions_config.inc.php on line 529
Strict Standards: Non-static method serendipity_plugin_api::get_event_plugins() should not be called statically in /home/buzzard/www/www/blog/include/plugin_api.inc.php on line 1041
Strict Standards: Non-static method serendipity_plugin_api::hook_event() should not be called statically in /home/buzzard/www/www/blog/include/functions_config.inc.php on line 414
Strict Standards: Non-static method serendipity_plugin_api::get_event_plugins() should not be called statically in /home/buzzard/www/www/blog/include/plugin_api.inc.php on line 1041
Strict Standards: Non-static method serendipity_plugin_api::hook_event() should not be called statically in /home/buzzard/www/www/blog/serendipity_config.inc.php on line 406
Strict Standards: Non-static method serendipity_plugin_api::get_event_plugins() should not be called statically in /home/buzzard/www/www/blog/include/plugin_api.inc.php on line 1041
Strict Standards: Non-static method serendipity_plugin_api::hook_event() should not be called statically in /home/buzzard/www/www/blog/index.php on line 402
Strict Standards: Non-static method serendipity_plugin_api::get_event_plugins() should not be called statically in /home/buzzard/www/www/blog/include/plugin_api.inc.php on line 1041
Deprecated: Non-static method serendipity_plugin_api::hook_event() should not be called statically, assuming $this from incompatible context in /home/buzzard/www/www/blog/include/genpage.inc.php on line 32
Deprecated: Non-static method serendipity_plugin_api::get_event_plugins() should not be called statically, assuming $this from incompatible context in /home/buzzard/www/www/blog/include/plugin_api.inc.php on line 1041
Deprecated: Non-static method serendipity_plugin_api::count_plugins() should not be called statically, assuming $this from incompatible context in /home/buzzard/www/www/blog/include/genpage.inc.php on line 35
Deprecated: Non-static method serendipity_plugin_api::count_plugins() should not be called statically, assuming $this from incompatible context in /home/buzzard/www/www/blog/include/genpage.inc.php on line 36
Strict Standards: Non-static method serendipity_plugin_api::hook_event() should not be called statically in /home/buzzard/www/www/blog/include/functions_entries.inc.php on line 355
Strict Standards: Non-static method serendipity_plugin_api::get_event_plugins() should not be called statically in /home/buzzard/www/www/blog/include/plugin_api.inc.php on line 1041
Strict Standards: Non-static method serendipity_plugin_api::hook_event() should not be called statically in /home/buzzard/www/www/blog/include/functions_entries.inc.php on line 464
Strict Standards: Non-static method serendipity_plugin_api::get_event_plugins() should not be called statically in /home/buzzard/www/www/blog/include/plugin_api.inc.php on line 1041
Strict Standards: Non-static method serendipity_plugin_api::hook_event() should not be called statically in /home/buzzard/www/www/blog/include/functions_entries.inc.php on line 1001
Strict Standards: Non-static method serendipity_plugin_api::get_event_plugins() should not be called statically in /home/buzzard/www/www/blog/include/plugin_api.inc.php on line 1041
Strict Standards: Non-static method serendipity_plugin_api::hook_event() should not be called statically in /home/buzzard/www/www/blog/include/functions_entries.inc.php on line 1090
Strict Standards: Non-static method serendipity_plugin_api::get_event_plugins() should not be called statically in /home/buzzard/www/www/blog/include/plugin_api.inc.php on line 1041
Strict Standards: Non-static method serendipity_plugin_api::hook_event() should not be called statically in /home/buzzard/www/www/blog/include/functions_entries.inc.php on line 1160
Strict Standards: Non-static method serendipity_plugin_api::get_event_plugins() should not be called statically in /home/buzzard/www/www/blog/include/plugin_api.inc.php on line 1041
Strict Standards: Only variables should be assigned by reference in /home/buzzard/www/www/blog/include/functions_smarty.inc.php on line 73
Strict Standards: Only variables should be assigned by reference in /home/buzzard/www/www/blog/include/functions_smarty.inc.php on line 73
Strict Standards: Non-static method serendipity_plugin_api::hook_event() should not be called statically in /home/buzzard/www/www/blog/include/functions_smarty.inc.php on line 553
Strict Standards: Non-static method serendipity_plugin_api::get_event_plugins() should not be called statically in /home/buzzard/www/www/blog/include/plugin_api.inc.php on line 1041
All Content Copyrighted 2024 Buzzard Mountain Instruments, LLC